Slide # 1

1

GET TUTORIALS RELATING TO JAVA S40 N AlchemyOS N OTHER OS!!! Read More

Slide # 2

2

GET TUTORIALS RELATING TO JAVA S40 N AlchemyOS N OTHER OS!!! Read More

Slide # 3

3

GET TUTORIALS RELATING TO JAVA S40 N AlchemyOS N OTHER OS!!! Read More

Slide # 4

4

GET TUTORIALS RELATING TO JAVA S40 N AlchemyOS N OTHER OS!!! Read More

Slide # 5

5

GET TUTORIALS RELATING TO JAVA S40 N AlchemyOS N OTHER OS!!! Read More

Saturday, 26 July 2014

Latest Free Recharge Earning Android App(free+)

Presenting the latest free recharge earning Android Application, by which you can earn by inviting friends and downloading android apps. You can get free recharge of Rs. 10 in few minutes. We have shared many free recharge tricks recently which you can find by checking all pages.

Free recharge is getting popular day by day and many companies are grabbing this opportunity to make profit. You might have heard about Mcent, Earntalktime, Ladooo, etc applications which are also giving you free recharge just by downloading Android application.

This application has a special earning feature that if you open that app daily then you will earn daily reward starting just by opening application. Cool right ? :D

Steps To Get Free Mobile Recharge- 


  • Now click on "Create".
  • Now enter your Email ID, Name, Password.
  • Now it will ask for invite code, then enter this code to get small reward- n102025

  • Now you are log in to your account.
  • Now go to Invite tab to get your own referral link / invite code and share it with your friends. :)
  • Now go to "Daily Rewards" and click on claim reward.
  • Now Go to offers and download applications to earn more.
source: earticleblog


Thursday, 24 July 2014

UC Browser 9.9.0 for Android is Officially Released!!


Dear friends,

After days and nights hard work, UC Browser 9.9.0 for Android is officially released now. UC Browser for Android now updated to be the fastest mobile browser to load Facebook. Click here to download from UC offical website!


What's New:
1. FB Faster Add-on
Enjoy the fastest Facebook browsing with the FB Faster add-on.

2. Resume all interrupted downloads
Save data usage and time by resuming all interrupted downloads where it stopped.

3. Optimized Flash Loading
Better caching of flash elements to save memory space.

4. Less Waiting Time
Wait less when you move from one page to another.

download here

UC Browser Mini 9.3 for Android is Officially Released


Hello everyone~

I'm so glad to tell you that UC mini 9.3 version is officially released!

Here are the new features of 9.3:

  • Share your favorite websites 
    Share interesting websites with your friends with just a single click.
  • Bitmap font 
    Browse pages in your local language such as Hindi and Tamil, even if your phone does not support these.
  • More stable downloading 
    Improved downloading for more successful downloads.
  • Bug fix
       Saved pictures can now be found in the gallery.


Click here to download uc mini9.3 from Google Play~!


Hope you could enjoy it~!

Tuesday, 22 July 2014

How To Change Android Font Safely And Easily


It is so difficult to change the system font on Android !! Or Is it really ? ?


Some people look at the archives of the system to update the font through custom scripts. Many Change Whole ROM or Use Complicated Methods. And Many People End up Bricking Their Device or Creating Boot Loop. You can Skip all This Trouble Just USing a Simple App Named "Fontster"


ploa


It also has a library of hundreds of fonts from which you can choose your preferred font and Install Them Easily. Any font can be applied as a system font.

You Must have Root Access To Use this App. It works Best on ASOP or Similar ROMS. You Need to Reboot your Device to completely Change Font.


You Can Download it Here From  Below
 Fontster-1.1.apk 1.92 M

Sunday, 20 July 2014

[Share] SAMSUNG GALAXY S3 / S4 SECRETS CODES


Samsung Galaxy S3/S4 HUGE list of codes

*#06# Shows IMEI (International Mobile Equipment Identity) number

*#0*# LCD Test Menu
Dial the secret code *#0*#. Now you get a screen with title LCD TEST as shown in image and below that you have lots of option to test various hardware parts of your phone such as speaker, sensor, lcd, etc

*#8999*523# LCD Brightness

*#1234# To check Software and Hardware information, PDA, CSC, MODEM (Firmware Version)

*#2222# H/W Version

*#*#4636#*#* user statistics and Phone Info

*#0011# Displays status information for the GSM

*#7780# Factory Reset
*2767*3855# Full factory reset (Don’t dial unless you have problem, it does not ask you to confirm )

*#12580*369# SW & HW Info
#*#8377466# S/W Version & H/W Version
#*2562# Restarts Phone
#*3849# Restarts Phone
#*3851# Restarts Phone
#*3876# Restarts Phone
#*5376# DELETE ALL SMS!!!!
*#197328640# Service Mode
*#0228# Battery status (ADC, RSSI reading)
*#32489# Service mode (Ciphering Info)
*#2255# Call List
#*3888# BLUETOOTH Test mode
#*7828# Task screen
*#5282837# Java Version
*#232337# Bluetooth MAC Adress
*#232331# Bluetooth Test Mode
*#232338# WLAN MAC Address
*#232339# WLAN Test Mode
*#8999*8378# Test Menu
*#0842# Vibra Motor Test Mode
*#0782# Real Time Clock Test
*#0673# Audio Test Mode
*#0*# General Test Mode
*#2263# RF Band Selection / Network modes select
*#9090# Diagnostic ConfiguratioN
*#7284# USB I2C Mode Control
*#872564# USB Logging Control
*#4238378# GCF Configuration
*#0283# Audio Loopback Control
*#1575# GPS Control Menu
*#3214789650# LBS Test Mode
*#745# RIL Dump Menu
*#746# Debug Dump Menu
*#9900# Takes you to System Dump, where Disabling Fast Dormancy gives a boost to your network speed on some networks (both wifi and Gprs), same code to re-enable it
*#44336# Sofware Version Info
*#0289# Melody Test Mode
*#2663# TSP / TSK firmware update
*#03# NAND Flash S/N
*#0589# Light Sensor Test Mode
*#0588# Proximity Sensor Test Mode
*#273283*255*3282*# Data Create Menu
*#273283*255*663282*# Data Create SD Card
*#3282*727336*# Data Usage Status
*#7594# Remap Shutdown to End Call TSK
*#34971539# Camera Firmware Update
*#526# WLAN Engineering Mode
*#528# WLAN Engineering Mode
*#7412365# Camera Firmware Menu
*#07# Test History
*#3214789# GCF Mode Status
*#272886# Auto Answer Selection
*#8736364# OTA Update Menu
*#301279# HSDPA/HSUPA Control Menu
*#7353# Quick Test Menu
*2767*4387264636# Sellout SMS / PCODE view
*#7465625# View Phone Lock Status
*7465625*638*# Configure Network Lock MCC/MNC
#7465625*638*# Insert Network Lock Keycode
*7465625*782*# Configure Network Lock NSP
#7465625*782*# Insert Partitial Network Lock Keycode
*7465625*77*# Insert Network Lock Keycode SP
#7465625*77*# Insert Operator Lock Keycode
*7465625*27*# Insert Network Lock Keycode NSP/CP
#7465625*27*# Insert Content Provider Keycode
*#272*IMEI# then we will get buyer code (For samsung galaxy sIII csc code)
*#*#7780#*#* Factory data reset – Clears Google-account data, system and program settings and installed programs. system will not be deleted, and OEM programs, as well as My Documents (pictures, music, videos)

How To Install Android L Preview Right Now


The next version of Android isn't ready or even properly named yet, but Google has kindly released a Developer
 Preview of the software so anyone bold enough can take a look at what it offers. All you need is a spare Nexus
 5 or 2013 Wi-Fi Nexus 7 that you don't rely on, and the instructions we've laid out below.


It's worth emphasizing that this is an early, buggy, developer preview—you risk seriously messing up your
 device and losing any data it holds, so make sure photos, music and so on are well backed up before you get
 started. Android L itself appears stable enough, but many of your favorite third-party apps won't yet be
compatible with it and may throw up errors.


In other words, don't install Android L on a device you need every day.

Downloads and installs

You're going to need three downloads from the Web, some of which you may already have if you've
 dabbled in Android rooting and modifications before. First of all, find the system image you need for
 your Nexus 5 or Nexus 7 from the 
the official download page. In this guide, we're using the Nexus 7
"Razor" version, which weighs in at 422MB. Keep this in a safe place on your system.
Then you're going
 to need the 
Google USB driver for Windows. You may have attached your phone or tablet to your PC
 before, but these specialist drivers enable you to do more than just copy over music and photos.
 Finally, you're going to need the 
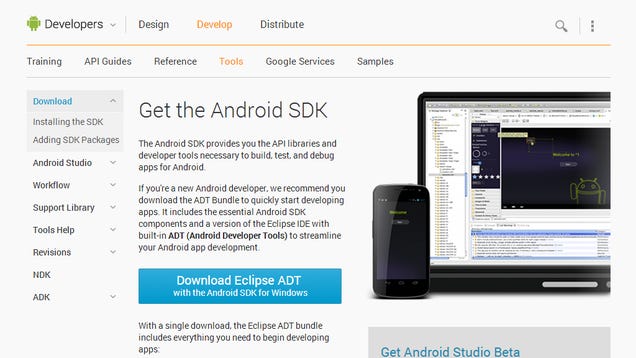
Android SDK kit, which you can unpack in a folder of your choice
—just remember where that folder is.

On your Nexus device, open Settings then choose About phone/tablet. Tap the Build number seven
 times to activate the Developer options entry on the Settings screen, then go back and select it. Switch
 on USB debugging, which enables you to swap out the device's operating system, among other functions.

Plug your phone or tablet into your computer and make sure it's connected as a camera device (PTP) 
rather than a media device (MTP)—you should be able to do this from the drop-down notifications
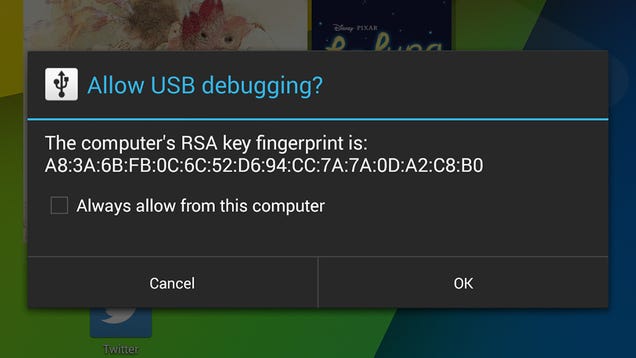
 drawer. If you see a confirmation message asking whether to allow USB debugging, choose OK.
Update the relevant Windows drivers using the Google USB driver we downloaded earlier. Perhaps
 the easiest way to do this is to launching Device Manager from Control Panel, right-click on the 
Android device entry and choose Update Driver Software. Opt to Browse my computer for driver
 software when the option appears to point the installer to the driver package you've saved from the
 Web.With these steps done you're ready to launch the Android SDK and begin installing the Android
 L software on your device.


Installing Android L


The interface of the Android SDK Kit can appear overwhelming at first—it's aimed at app developers,
 after all. Thankfully, you don't have to delve too far into it—select everything in the top Tools section
, then click the Install button. You can now turn your attention to the system image you've downloaded
 for the Nexus 5 or Nexus 7


The .tgz archive file you've saved to disk holds another archive file in the .tar format. Use a tool such
 as 
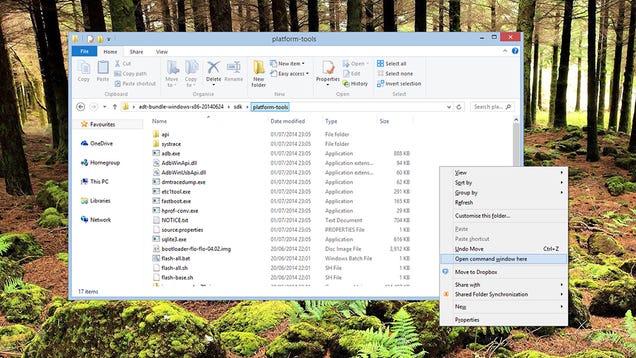
7-Zip to extract the individual files in this second archive to the platform-tools folder contained
within the location where you've placed the SDK kit. These files include the device image itself and
the routines required to install it.

Open this platform-tools folder in File Explorer, hold down Shift and right-click inside it. ChooseOpen
 command window here from the menu to bring up the command prompt. Type adb devices and hit
 Enter to see if your Nexus device is available — if nothing is shown under the list of attached devices, 
you've gone wrong somewhere. Retrace your steps to troubleshoot the problem, checking drivers, USB
 debugging and USB mode.
[size=0.9375]If your device is shown, switch it off then hold down the power and volume down buttons
 to get it into bootloader mode (which will show a list of device specs and an open Android robot on the
 screen). Alternatively, type adb reboot bootloader to do the same job.
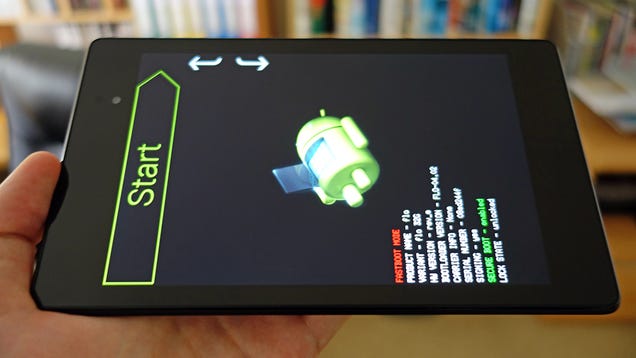
This mode gives us access to the system software, but the device still needs unlocking, unless you've 
gone through the process before—type fastboot oem unlock to do this. You'll need to confirm your 
decision on the device itself, signalling your intention to live on the cutting edge of Android development.

All that's left to do is install Android L. Type flash-all.bat in the command window to run the small script 
that flashes the new operating system to your device. This process can take some time—and the very first
 boot-up is a lengthy one too—so be patient while the upgrade is being carried out.

How To Get Android L’s Heads Up Notifications On Any Android 4.3+[No Root]


One of the most impressive parts of Android L demos in Google I/O 2014 was the notifications overhaul.
Everything from the design change in the notification drawer to lockscreen notifications was interesting.
One change that stood out was the heads up notifications feature, where a notification floats on top of
the everything else and you can either swipe it away to dismiss it or tap on one of the buttons to take
action.

For people who constantly find themselves in fullscreen apps like games and YouTube videos, this is going
 to be immensely useful. And the use case can extend even further. Even if you’re in an app that has the
status bar visible, once the notification preview is gone, it’s gone. You need to drag down from the status
 bar to access it. Having notifications, especially ones from chat clients or email show heads up during an
app can remove a lot of friction.

Android L release is not slated till fall of 2014. And even then the release will be limited to phones that had
the good fortune to be updated. You never know when and if your phone will be upgraded to Android L
. If it’s the heads up display functionality that you’re after, there’s a simple way to implement a version of
 it on any Android 4.3+ device (doesn’t require root).

Heads Up


Heads Up! is the app that we’ll be using to get this functionality on your device.i uploaded here for free
but If you want to receive prompt updates and want to support the developer you can install the Google
 Play Store version by paying $0.99.

When you get a notification you can either swipe it in either direction to dismiss it or double tap to open
 the app.

How to set up 

*.Download the app from below attachment and let's get started.
*.Tap the Start button and you’ll be prompted to grant the app Notification access. After you’ve come
 back to the app, it will ask you to reboot the phone to apply the changes.
*.Once rebooted, the app will be in action.

The Whitelist

Any new notification will now show up via Heads Up! But you might not want that. Because unlike normal
 notifications that live in the notifications drawer, the Heads Up! notifications by default stay there on the
screen until you swipe them away. Treating every notification like that can get pretty annoying.

This is where the Whitelist comes in handy. From Whitelist->Add new app, select the apps you want to
show up on the heads up notifications.
Go into settings and make sure the option Ignore whitelistis unchecked.

Only In Fullscreen Mode And More Options

If you want the functionality to be just like Android L Developer Preview, you can check the option that
 says Show notifications in fullscreen mode only.

You can also have the notifications dismiss automatically after a set period of time.

Movement of the position at which the heads up notifications show up is also possible.

So here my tutorial is ended and thanks for reading 

Have a nice day